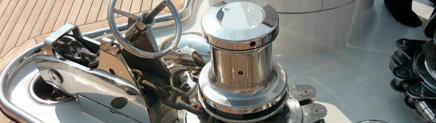
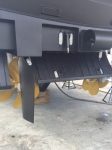
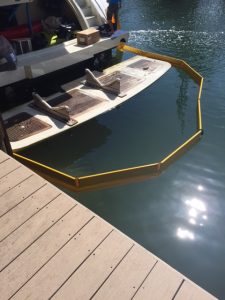
Archive | Hydraulics

Overhauling BCS trim tabs on an 85 foot Ferretti

BCS Trim Tab

Trim tabs are an essential component for any yacht. They improve performance, helping to increase speed, reduce pounding and on smaller boats offset prop torque. They help the vessel run more efficiently, reducing fuel consumption and engine laboring and eliminate “squatting.” But more importantly, they increase safety by improving visibility and handling along with reducing wake size and hull stress.

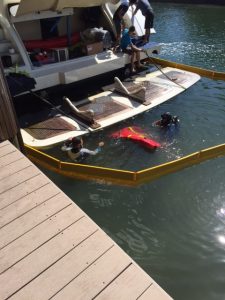
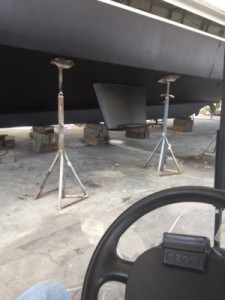
However, years of use and prolonged exposure to salt water can take a toll on their ability to function properly as was the case with an 85’ Ferretti that was hauled at Lauderdale Marine Center.

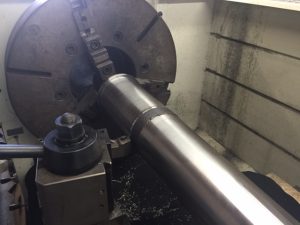
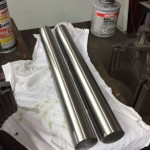
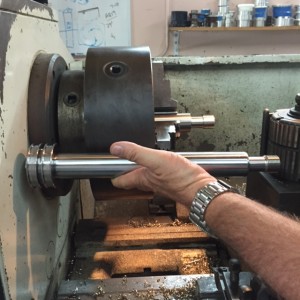
That is when our hydraulics team was called in to work on the BCS hydraulic trim tabs. Upon close inspection, we found that two of the four trim tab cylinders were corroded beyond repair and needed to be replaced. Because of manufacturer’s long lead time, we decided that we would machine new rods, barrels and re-build the cylinders in-house, using our machine shop, Straight Line Marine.
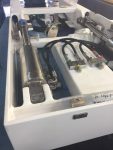
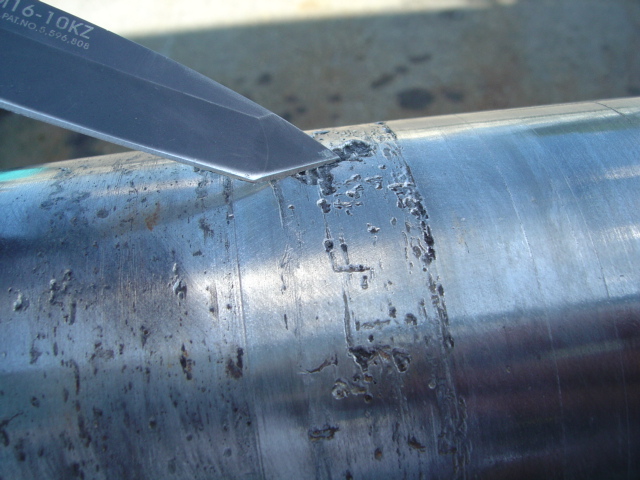
Corrosion in Barrel

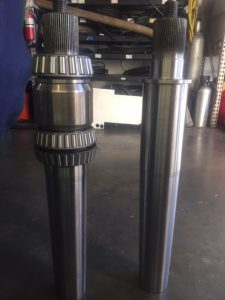
The corrosion we found on the inside of the barrel was caused by salt water intrusion as a result of failed seals. Once the components were machined, we were ready to assemble the new hydraulic trim tab cylinders and re-install in the yacht. Unlike common trim tab cylinders, the BCS model does not use hydraulic hoses to distribute the hydraulic fluid to operate the trim tabs. The fluid is dispersed through a small pin hole in the transom bracket assembly. A clever design that eliminates hose failure external to the transom. However this creates a tricky install.

Pin Hole

The pin has multiple O-rings and requires a special touch to avoid pinching during installation. Great care must be taken in the removal of the old hydraulic trim tab cylinders and the re-installation of the new ones. Damage to the assembly as a result of scratching or scoring the unit would cause them to leak and render the trim tab cylinders useless.

We see these types of nuisances all the time. It takes a team of highly experienced hydraulics technicians to properly diagnosis the problems and take the appropriate actions to correct them.

Giving an Old Hydraulic Royal Boarding Ladder a “Face Lift”

From time to time, we see some pretty old yachts come into Lauderdale Marine Center as was the case with a 30+ year old Feadship. This old gal was in need of some work to bring her back to her glory days. We were hired to give her hydraulic royal boarding ladder a “face lift.”  A hydraulic royal boarding ladder is side mounted typically at mid-ship that retracts using hydraulic folding mechanisms when not in use, leaving your deck free of obstacles.

The job included stripping the boarding ladder for a new paint job, replacing the hydraulic hoses and hydraulic cylinders and installing new hardware right down to the nuts and bolts.

The royal boarding ladder now looks brand new with no traces of 30-odd years of use.

Working on a 26T Crane takes special tools, equipment, coordination and expert experience

The captain of a 215’ Expedition recently contracted our hydraulics team at High Seas Hydraulics to work on the vessel’s crane. This particular yacht is a shadow boat hired out to “shadow” luxury yachts ferrying extra crews and other “toys” the luxury yacht owners or guest may need on their extended voyages. Those toys can range from large tenders to cars to even a helicopter.

The two luffing cylinders on the crane were leaking hydraulic fluids at the seals and needed resealing before the vessel went out to sea again. The catch on this job was the size of the crane, the weight of the cylinders and the timeline to fix. We had just one week to pull, diagnose, fix and re-install the luffing cylinders on this 26 ton crane, the largest crane we have worked on at High Seas Hydraulics. Each luffing cylinder weighs over a ton and needs special equipment to handle.

Coordination was key to ensure this job went smoothly. We first had to rent scaffolding that needed to be erected on the aft deck in order 
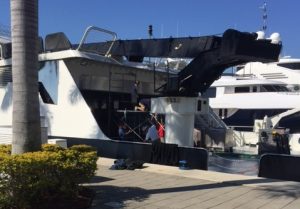
for our hydraulic technicians to reach and secure the cylinders for removal from the boat. We then rented a boom truck with a 73 foot reach from a local business to remove the luffing cylinders from the yacht and place on our sister company, Straight Line Marine’s flatbed truck for transportation back to the shop. Having a flatbed truck as part of our fleet comes in handy for these types of jobs as well as moving large shafts from mega yachts.

Once back in the shop, we inspected the luffing cylinders and sent them out to be resealed. The company that we contracted to reseal the luffing cylinders was unable to pressure test the luffing cylinders due to equipment problems so they were returned to High Seas Hydraulics. Fortunately, we have the proper equipment and experienced technicians to perform the testing in house for these cylinders that required 2,500 pounds of pressure.

Communications is key

Upon completion of the service work and testing, we returned the luffing cylinders to the yacht using our flatbed, brought the rental boom truck back and re-erected the scaffolding. Here is where the real precision work comes into play. While the boom truck does the heavy lifting, our hydraulic technicians guide the cylinders into place using safety line, straps and chain come-along ratchets. Communications with the crane operator is crucial and is most often done with hand signals.

We first secured the lower end of the cylinders into the crane and pinned them into place while they were still 
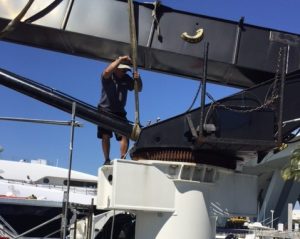
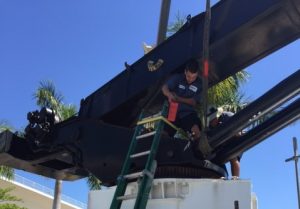
attached to the boom truck crane. Installing the pin on a crane of this size takes balance and a little brute force! Once in place, we released the straps from the boom truck crane and using straps and the chain come-along ratchets, raised the luffing cylinders into place for securing the top to the crane. We then reattached the hydraulic hoses to the yacht’s crane so we could use the boat’s hydraulic power to extend the luffing 
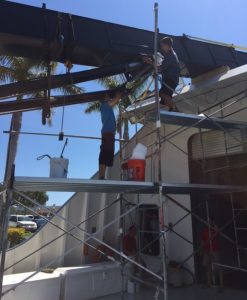
cylinders for the final pin installation. While this work takes experience and knowledge of the process, performing the task while standing on scaffolding more than 10 feet of the deck adds to the complexity.

Once the luffing cylinders were firmly and securely in place, we re-installed the rest of the hydraulic hoses and tested the crane to ensure that it was working properly for the demanding tasks it undertakes while at sea.

This was a big job with a tight timeline that we were able to push through so the captain could meet his charter schedule. This shadow boat is ready to set sail with those “little extras” that help to make memorable adventures.

Performing a Major Overhaul on NAIAD Stabilizer System

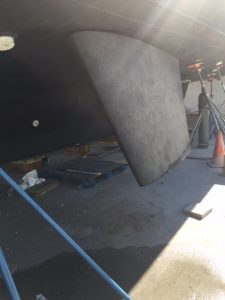
Continuing the work on the 135’ Broward, we have moved on to work on the NAIAD stabilizer system. While NAIAD does not specify an exact interval for performing a major overhaul, it does recommend replacing the lower seals every three years or 4,000 operating hours. Interim service and maintenance should be performed annually but a major overhaul is highly recommended anytime you find water in the grease beyond the outer shaft seals or signs of grease oozing from the inner seals around the shaft.  Once salt water compromises the grease the bearings will start to deteriorate and the grease needs to be replaced

For this project the customer wanted the major overhaul which encompasses removing the fins from the boat, removing the top plate, tiller arm, hoses and shaft. Taking apart the cylinders, inspecting the potentiometer. Basically, the entire system is removed and stripped down.

The upper and roller bearings are installed on the shaft. So when the shaft is removed the roller bearings stay with it. The roller bearings are cut off the shaft in our machine shop, Straight Line Marine. Next the shaft is polished in a lathe and inspected for corrosion or scarring in the lip seal area   . If we do find corrosion, we will clad the corroded area. In this case, we did find corrosion. Once the work on the shaft was complete, we installed new bearings using heat to avoid scoring the shaft.

Cladding shaft

Once the vessel is launched, we will bring up the electronic side of the system and test or reset the potentiometers. It is usually not until this late stage in the project that we can determine if the potentiometers need to be replaced. Once we completed all the steps for this major overhaul, we reassembled the unit and re-installed it back in the boat. The hydraulic stabilizer system on this Broward yacht is good as new and ready to take the captain and crew on more adventures and smooth sailing.

For more information on performing major overhauls on hydraulic stabilizer systems, check out our technical article on the process.

Manually Raising a Hydraulic Swim Platform After a Failure


Platform submerged

Our hydraulics team at High Seas Hydraulics was recently called out to help the captain of a 95 foot Technema yacht docked behind a private residence with a problem with the ship’s hydraulic swim platform. The hydraulic swim platform was stuck in the down position below the water line and leaking hydraulic fluids into the water. Before the team started to work on raising and securing the hydraulic swim platform, they needed to contain the leaking hydraulic fluids.  Upon arriving on site, they quickly deployed a special containment boom and secured it to the transom of the boat. They also used absorbent pads to filter the hydraulic fluids that had already leaked into the water. Once the boom was secured, the work could commence to start to raise the hydraulic swim platform so that the yacht could be moved to a yard for repair.

For this job, we hired professional divers to deploy air bags under the platform to raise it enough to use a pulley and ratchet system to hoist the hydraulic swim platform back onto the the locking hooks on the transom of the boat where it would normally rest. We first needed to

Divers with air bags

secure the hydraulic swim platform with straps that we could attach to the ratchet system in order to help raise it after the air bags
were inflated.

Once the hydraulic swim platform was raised a couple of inches with the air bags, we disconnected the hydraulic hoses on the inboard side of the unit to alleviate back pressure to help stem the flow of any additional hydraulic fluid into the water.  Relieving the back pressure also allowed the hydraulic cylinders to move more freely in order to raise the hydraulic swim platform. After the hydraulic swim platform was aligned and snug to the boat, it was further secured with straps and the locking hooks for its journey to the boat yard.

Platform secured to transom

One of the primary reasons for a failure of this type is wear and tear and prolonged exposure to sea water of the hydraulic cylinders and hoses that are located on the outboard side of the yacht. To avoid this type of problem, it is a good idea to inspect the hydraulic cylinders and hoses every time the boat is hauled and refurbish or replace them at the first sign of wear on the components. Spending a little time and money to keep the parts of the hydraulic swim platform that are exposed to sea water in top operating condition can ultimately save you big money in the future, not to mention potential fines and citations should your vessel leak hydraulic fluids into the waterways. While this type of failure is not prevalent, the day after we performed this job we were called out to perform the exact same thing on a 64 foot Azimut.

Refurbishing a Hydraulic Steering System on a 135 foot Broward Yacht


As part of the refit of the 135 foot Broward, the new owner wanted a complete overhaul done on the hydraulic steering system. We started by removing the steering cylinders for tear down and reseal before sending them out to be painted.

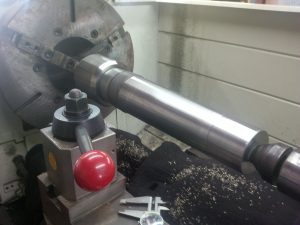
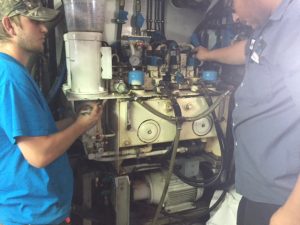
We next disassembled and removed the hydraulic power unit (HPU). The HPU consists mainly of a pair of motors, a reservoir tank and a hydraulic pump. These units can generate a tremendous amount of power to drive most any kind of hydraulic ram. Hydraulic Power Units are based on Pascal’s law of physics, drawing their power from ratios of area and pressure. In this case, the HPU takes the commands from the helm to push the hydraulic rods in the right direction to steer the yacht. A failure of the hydraulic steering system at sea or just about anywhere could prove to be catastrophic.

Once the unit was out of the boat, we cleaned the tank, check the values, sent the electronic 
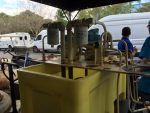
motors out for testing and tested all of the pumps to ensure they were in good working order. We also made all new hoses for the unit in our hydraulics shop.

Once all parts were examined for quality control purposes, we reassemble the HPU and installed it back in the boat. A completely refurbished hydraulic steering system to like-new specifications will help to provide peace of mind that this yacht and her crew can safely navigate through any waters.


Whether you need hydraulic repairs, running gear work or shafts straightened – High Seas Family of Companies is here to serve

It’s not unusual for mega yachts to haul out at Lauderdale Marine Center requiring extensive work on multiple parts of the boat. That was the case for a 135 foot Broward yacht when she came into the yard. The Captain of the yacht approached High Seas with a laundry list of requirements that included hydraulics and running gear jobs. High Seas is unique in the sense that we have the expertise to work on both areas, providing a central point of contact that can help to design the most efficient work flow through coordinated schedules.

For this yacht, we were hired to:

  • Perform a full NAIAD 505 service with shafts out and new bearings
  • Do a full rebuild on the Hydraulic Steering System including removing the HPU and replacing hoses
  • Reinstall PTOs on new generators with new hoses
  • Refurbish the steering cylinders
  • Remove rudders for a bearing inspection and repack stuffing boxes
  • Remove shafts for new bearings, packing and alignment
  • Complete removal and rebuild of Maxwell 11000 windlasses

In coming posts, we will walk through the steps we took to make this yacht ship shape again.

Stabilizer shaft cladding to repair corrosion found during 10 year service process

A 130 foot Westport Yacht was recently hauled at Lauderdale Marine Center for routine service and maintenance. While in the yard, High Seas Hydraulics was contracted to overhaul the stabilizers and perform a standard 10 year service process on them.

Stabilizer shaft cladding

Once the stabilizers were removed, we found that the stabilizer shafts were corroded to the point that we needed to call on our machine shop, Straight Line Marine, to perform a process called shaft weld-overs, also known as cladding (or incorrectly “metalizing”). Shaft weld-overs or cladding is the process of repairing a worn or damaged area on a shaft.   Stainless steel shafts can be damaged by excessive wear in contact areas, such as bearings or seals, due to long life or misalignment. Shafts can also be damaged from crevice corrosion or stray current corrosion.

Typically, if the wear is smooth and less than 0.010″ deep it is acceptable. Any crevice corrosion, stray current corrosion or wear in a lip seal area must also be repaired since lip-seals such as Naiad or Tides Seals need a smooth surface to maintain water tight integrity.

Stabilizer shaft on lathe

When repairing a shaft, it must be placed in a lathe and have the damaged area turned down to remove the damaged area.  Never more than 0.125″. The area is built back up using semi-automatic MIG welding while slowly turning in the lathe. After cooling, the shaft is turned back down to close to the original shaft diameter.

Expert weld-overs cannot be detected by eye or feel once complete.

Finished product

Maintaining your stabilizer systems – what to look for before they fail!

A 100 foot Marlow yacht was recently hauled at Lauderdale Marine Center for routine maintenance that included her running gear, hydraulics, topside paint and other services. The captain turned to High Seas Yacht Hydraulics for the ship’s hydraulics inspections on her stabilizer and our sister company, High Seas Yacht Service for her running gear.

marlow v2
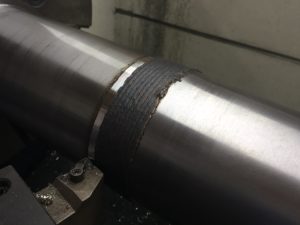
The boat had a Naiad stabilizer and hydraulic system. During our inspection of the stabilizers, we found evidence of grease passing through the inner seal housing.
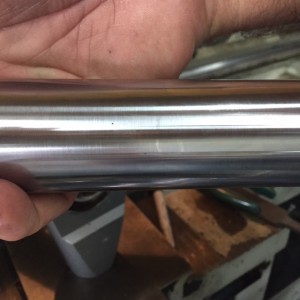
 This is a maintenance requirement that should be performed every 2-3 years or sooner based on the grease pushing past the inner seals. That is a sign of the outer seals failing and allowing water to pass through into the bearing housing. Typically, this is due to normal operation, wear and tear, but can be the result of inferior seals that were used when the technician is not properly trained in the servicing of these stabilizers. 

To remedy the situation, you must first hydraulically remove the fins, top plate assemblies, upper and lower seal housings and actuators. The next step is to clean and inspect all bearings and races, replacing bearings if needed. The actuators would then need to be reassembled, pack seal housings with grease and install upper and lower seal housings. Finally, we re-install the fins, top plate assemblies and set fin indicators (potentiometers) to the proper level. 

Generally, hydraulic systems should be inspected before any significant trip. Service, oil and filter changes should be completed at least every 2-3 years. Hydraulic oil breaks down even when the boat is sitting idle and not being used often. As far as major service goes, we feel that depends on operating pressure and temperature readings while the systems are engaged. Also another indicator of a potential problem is when filters are changed and debris is found in them.  This could be a sign of pumps possibly starting to fail. 

 It is vital to follow your manufacturer’s recommended service intervals and use quality parts and trained technicians to service these highly-used and valued pieces of equipment. 


Fabricating new hydraulic rods for Quantum Stabilizer cylinders

Fine Scores In Rods

Fine Scores In Rods

A customer walked into High Seas Hydraulics with three leaking Quantum Stabilizer cylinders from a 150 foot Trinity motor yacht. Upon close inspection, it was determined that there were fine scores or scratches in the hydraulic rods that were causing the fluid to bypass the seals. These scratches could not be repaired or polished out so new hydraulic rods would need to be installed.

Raw material for rods

Raw material for rods

That is when our hydraulic teams turned to our sister company, machine shop Straight Line Marine. Through our procurement department at High Seas, we were able to source raw materials to fabricate new hydraulic rods within a day.

The Straight Line Marine machinist went to work and crafted new rods to exact specifications including intricate thread machining.

Finished rod

Finished rod

The ability to bring the stabilizer cylinders back to top working order with new hydraulic rods fabricated on-site in our machine shop saved this motor yacht’s owner and captain both time and money and was completed from a one-stop company.