Archive | Hydraulic Power Units

Caring for Your Hydraulic PTO Pumps

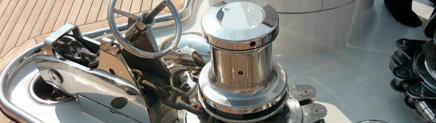
Our hydraulics team was recently contacted by a welding contractor at Lauderdale Marine Center to remove a PTO pump off a 150’ Palmer Johnson’s main hydraulics system so they could gain access to the ship to perform their work. What started as a fairly routine job quickly turned into something much more. The splines on the unit had seized, taking what would have been roughly a half day of work to several days.

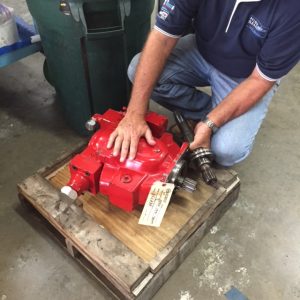
Typically, we would construct an A-frame rigging to hoist the PTO pump out of the boat but in this case, we were forced to cut the unit apart and remove it in pieces. Because of this, the ship now requires a whole new replacement unit. Once it was uncovered that the first PTO pump could not be removed using standard procedures, the ship’s engineer had us remove the second pump to check the splines. Fortunately, the second unit did not have the same problem.

We highly recommend removing, refurbishing and re-installing these PTO pumps every three years or so for routine maintenance. Just like the top-end of a windlass which should be removed, cleaned and re-installed with new grease ever couple of years; PTO pumps need to be serviced to ensure that they do not experience these types of problems with seizing.

A proactive approach to maintaining these critical components of your hydraulics systems will pay big dividends and potentially save thousands of dollars in the end.

Bringing New Life Back to an Older 112’ Westport Yacht

We are seeing a growing number of new owners of older 112’ Westports. This “Made in America” production boat has a lot to offer but many of these vessels are purchased without a solid maintenance history. Nevertheless, their new owners/Captains still want to bring them back to life.  In order to do that, sometimes a total refit of the vessel is required.

One of these new owner refits spent a few months at LMC getting a full paint job, mechanical upgrades, interior work and hydraulic systems overhaul and refurbishing. Our capable team of hydraulic technicians was tapped to handle all the hydraulic projects.

Starting with the Naiad stabilizer system, we did a full rebuild including removing the shafts and bearings.  The entire stabilizer actuator system was also rebuilt back to new.  The stabilizer shaft had some corrosion in the lip seal area from sitting too long in salt water so our on-site machine shop, Straight Line Marine, performed a cladding repair.

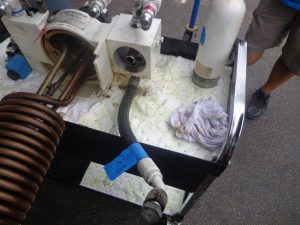
We then moved on to work on the entire hydraulic central system where we performed a full hydraulic fluid flush, cleaned and pressure tested the heat exchangers and changed all the filters.

In the engine room, we found that we needed to change a large number of the hydraulic hoses.  Hydraulic hoses have a 10-year life and can cause huge problems when they fail on the high-pressure side so it is very important to inspect and replace them during routine service.

We also did a little work on the bow thruster, installing new seals in the lower leg, adding fresh gear oil and testing the hydraulic motor.

Stainless steel ring on main gear

Our team did a full rebuild on the single Maxwell 4500 windlass on the bow, down to the gear box including installing new seals and bearings.  As part of the rebuild, Straight Line Marine also fabricated new stainless steel rings for the main gears to help prevent future gear oil leaks around the lip seals. We also replaced the small Maxwell 2500 capstans in the stern with new electric units due to the cost of installing new versus re-building these smaller units.

We found the steering system to be in good shape.  There were no leaks on the cylinders so these were left alone.  We did, however, replaced a few hoses and upgraded some of the ball valves to stainless steel to help prevent future corrosion.  Finally, we changed the fluid and filters.

This was a big job from start to finish but our talented hydraulic technicians, supported by our in-house machine shop, were more than capable of tackling every hydraulic system from bow to stern and everything in between.

Repairing a leaking Heat Exchanger in a Bow Thruster HPU

We were recently contracted to inspect a leaking heat exchanger on a 130 foot Westport yacht docked at a local marina. The heat exchanger was part of the hydraulic power unit (HPU) for the ship’s bow thruster system.  The HPU consists mainly of a motor, a reservoir tank and a hydraulic pump. These units can generate a tremendous amount of power to drive most any kind of hydraulic ram or motor. They can also generate high temperatures. Most heat exchangers used in the marine industry are water cooled and use a water control valve to regulate the flow of water though the exchanger to keep the hydraulic fluid temperature between 64 and 68 degrees C (147 and 155 degrees F). It is important to make sure the adjustments for the water control valve are set properly to avoid rapid overheating.

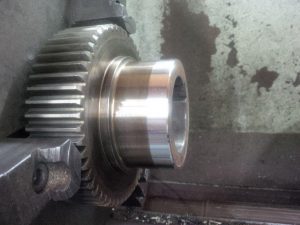
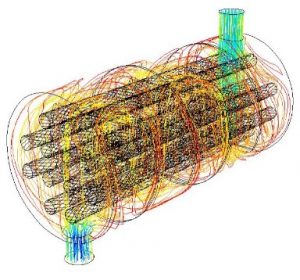
This particular model was a shell and tube design.  As its name implies, this type of heat exchanger consists of a shell (a large pressure vessel) with a bundle of tubes inside it. One fluid runs through the tubes, in this case hydraulic oil, and another fluid, water, flows over the tubes (through the shell) to transfer heat between the two fluids. The set of tubes is called a tube bundle and may be composed of several types of tubes.

Upon inspection, we found that the fittings in the heat exchanger were not properly seated and the sealant used was not sufficient for the job. In order to remedy the problem, we needed to remove the heat exchanger from the HPU and send it out for servicing. In order to do this, we had to disconnect the hard pipe Stauff clamps above the heat exchanger in order to spread the pipes apart to remove the heat exchanger from the bilge. We also disconnected and installed caps and plugs in the hoses connected to the heat exchanger. We resealed the adapters and fitting upon re-installation, connected the hydraulic hoses, installed Stauff clamp supports and tested the unit for leaks.

The heat exchanger is back in operation and helping to ensure that the hydraulic bow thrusters are doing their job helping to maneuver this yacht in tight places.


Refurbishing a Hydraulic Steering System on a 135 foot Broward Yacht


As part of the refit of the 135 foot Broward, the new owner wanted a complete overhaul done on the hydraulic steering system. We started by removing the steering cylinders for tear down and reseal before sending them out to be painted.

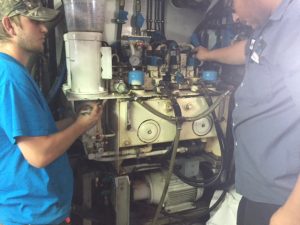
We next disassembled and removed the hydraulic power unit (HPU). The HPU consists mainly of a pair of motors, a reservoir tank and a hydraulic pump. These units can generate a tremendous amount of power to drive most any kind of hydraulic ram. Hydraulic Power Units are based on Pascal’s law of physics, drawing their power from ratios of area and pressure. In this case, the HPU takes the commands from the helm to push the hydraulic rods in the right direction to steer the yacht. A failure of the hydraulic steering system at sea or just about anywhere could prove to be catastrophic.

Once the unit was out of the boat, we cleaned the tank, check the values, sent the electronic motors out for testing and tested all of the pumps to ensure they were in good working order. We also made all new hoses for the unit in our hydraulics shop.

Once all parts were examined for quality control purposes, we reassemble the HPU and installed it back in the boat. A completely refurbished hydraulic steering system to like-new specifications will help to provide peace of mind that this yacht and her crew can safely navigate through any waters.